![]()
When streaming video content over the internet there is always the chance of buffering and stuttering issues, even when you are using Kodi. In this guide we will show you how to fix Kodi buffering in a couple of easy steps and enjoy video streaming again without any trouble.
Possible reasons for buffering in Kodi
Video streaming is happening in real time which means there are several factors which may be the cause of video buffering and stuttering. While most of the time it is a problem with your internet connection also faulty Kodi settings may be the issue.
Some possible reasons for video buffering in Kodi are:
– Slow or unstable internet connection
– Connection issues in your home network
– Limited bandwidth (by your internet provider)
– Kodi cache is not configured or configured wrong
– Too many people are watching the same stream
Recommended connection speed for video streaming
As you already know video streaming is happening in real time which means your internet connections must be as fast and stable as possible. The better the quality of the video content is (usually recognizable by the resolution like HD or 4K) the higher your connection speed has to be in order to play the video without any buffering or stuttering. Most of the time people with fast and wired connections don’t need to fix Kodi buffering at all.
Depending on the video resolution your internet connection should be this fast at least:
– Minimum connection speed in general: 1.5 Mbit/s
– Minimum connection speed for SD resolution (360p – 480p): 3 Mbit/s
– Minimum connection speed for HD resolution (720p): 5 Mbit/s
– Minimum connection speed for Full HD resolution (1080p): 10 Mbit/s
– Minimum connection speed for 4K resolution (2160p): 25 Mbit/s
If you are not sure how fast your internet connection is just perform a quick speed test on websites like fast.com (external). Please be aware that a wired connection is usually faster and has less latency compared to a wifi connection.
How to improve your internet connection
These tips will help you to improve your internet connection and fix Kodi buffering issues:
– Use a wired connection instead of WiFi
– If you are depending on WiFi make sure your router and device are as close as possible
– Make sure that no device is downloading large amounts of data
– Windows computers and game clients may download updates in the background
– Try to use Wifi range extender to improve your WiFi signal and quality
Tweak Kodi Cache settings to fix Kodi buffering
What is the Kodi cache?
In fact video streaming over the internet is not really happening in real time. There is always a very small delay because of the streaming technology in general.
When you start a video stream the data is being transfered into a cache (mostly the RAM). Your device is grabbing this information out of your RAM, encodes it and creates a frame on your screen. This happens several times in a second, so if your cache is not configured correctly or is filled too slow with data there might be buffering and stuttering. Kodi is just working like this as well.
What most people don’t know: You can configure and optimize your Kodi cache in order to fix Kodi buffering. You can do this manually by creating a file called “AdvancedSettings.xml” or just use a maintenance addon like the Open Wizard Kodi Addon.
Customize cache in Kodi 21 Omega
From version Kodi 21 Omega onwards, it is possible to customize the cache via the graphical user interface. This means that it is no longer necessary to use external addons or edit text files (as described in the following chapters).
The cache can still be adjusted via addons or the so-called “AdvancedSettings.xml” (see below). However, the values that are set in the graphical user interface always have priority and overwrite everything that has been configured otherwise.
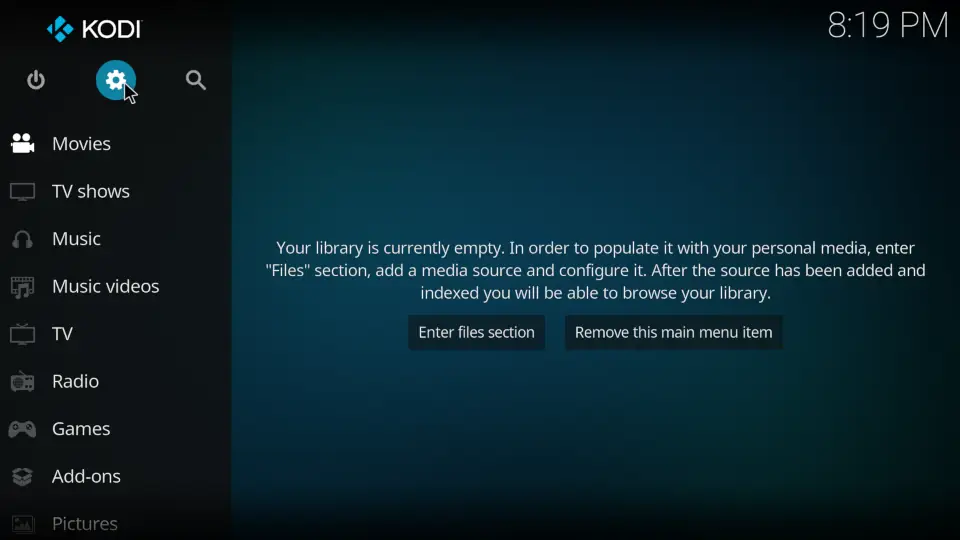
To configure the Kodi cache via the user interface, first open the settings. The quickest way to do this is to click on the gear icon at the top left of the start page.
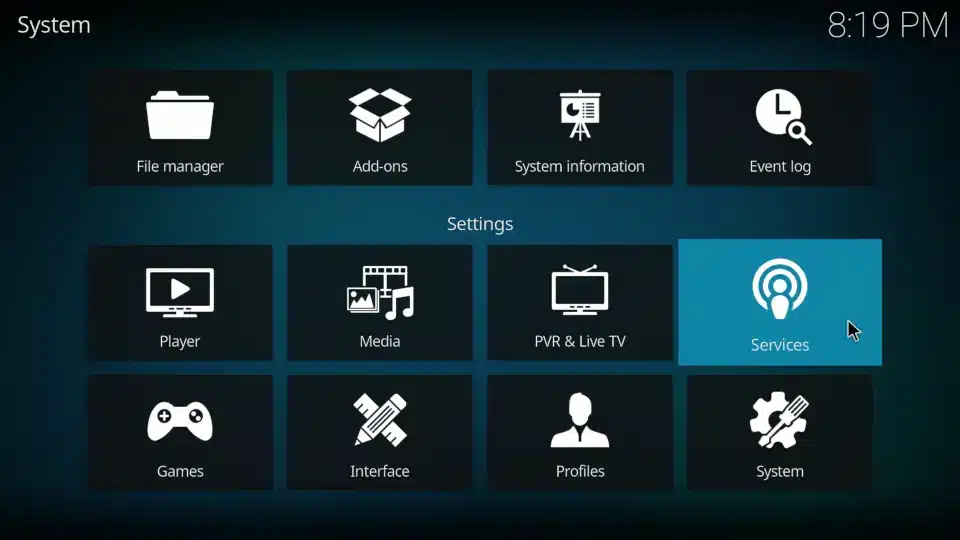
Now click on the “Services” item.
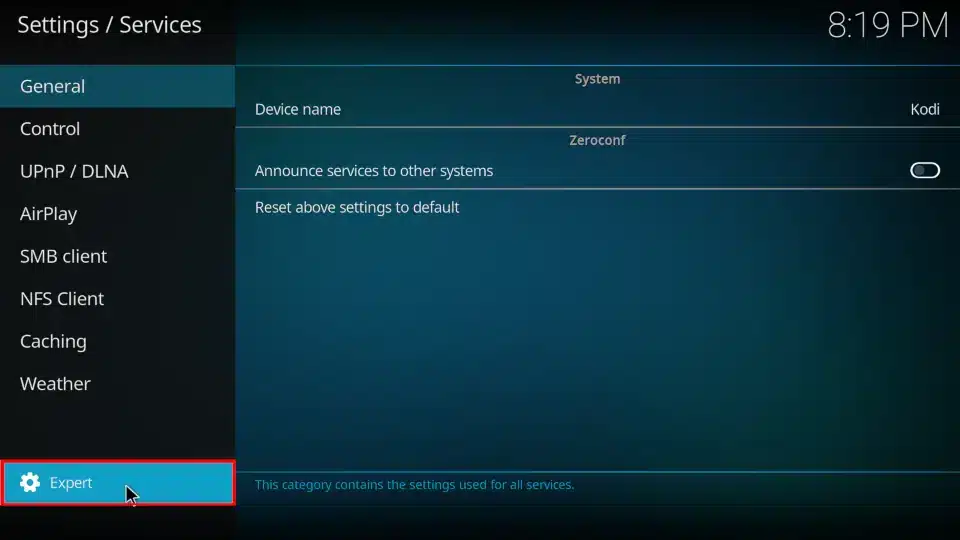
Make sure that the word “Expert” is displayed in the bottom left-hand corner next to the cogwheel symbol. Only then all available settings will actually be displayed. If the corresponding term is not there, click on the button until “Expert” appears.
The menu item “Caching” can be seen on the left-hand side. Select it with the mouse or remote control.
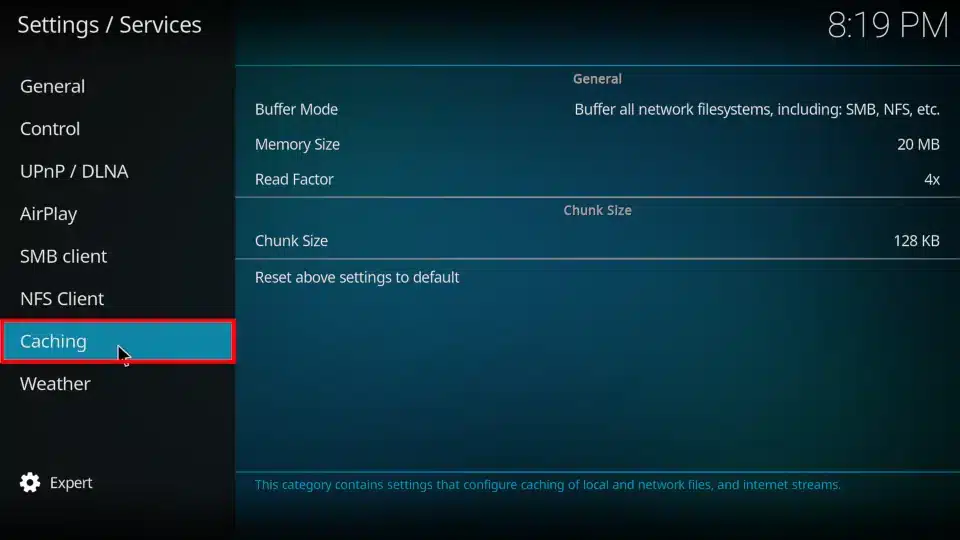
All available settings for the cache can now be seen in the center of the screen. The “Memory Size” option is the most important one. The other options can be ignored for the time being.
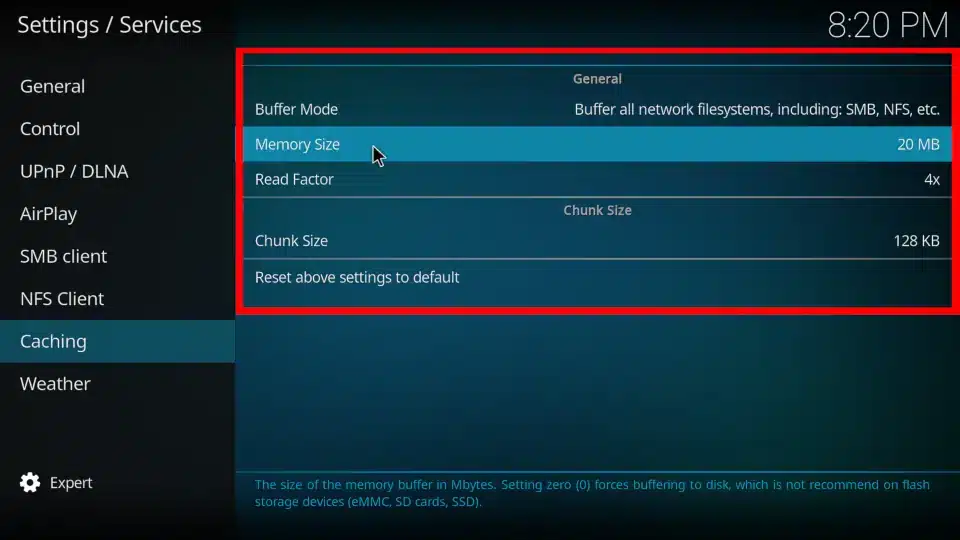
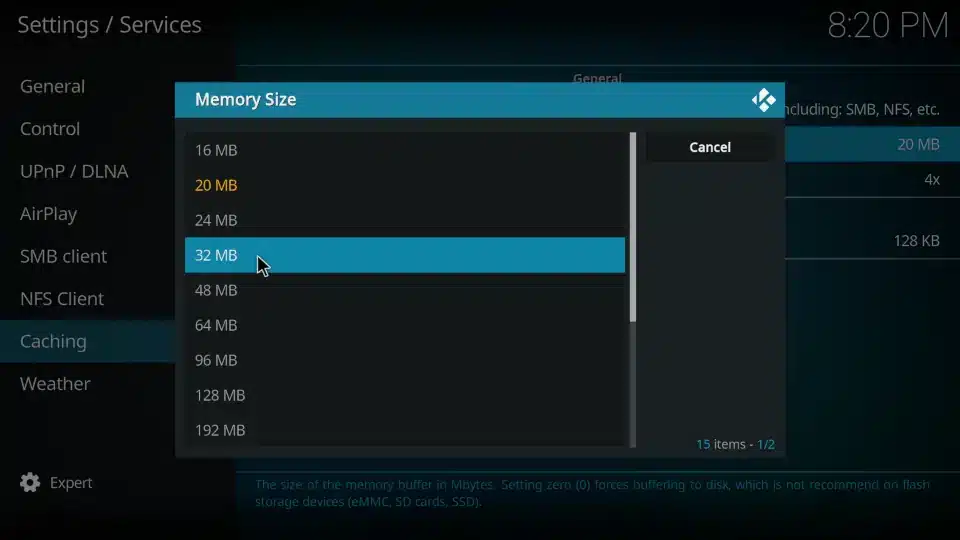
After clicking on “Memory size”, all available values are displayed in megabytes (MB). In contrast to the other methods shown in this article, no free value can be defined.
The rule of thumb is that the cache must not be larger than a third of the RAM.
For example, if your playback device has 2 GB of RAM (such as the Fire TV Stick 4K Max), the value in MB is divided by three (2 GB = 2000 MB, 2000 MB divided by 3), which corresponds to 666 MB. Therefore, 512 MB should be selected as the memory size. However, the maximum value that can be set via the user interface is 768 MB.
In this example, we select 32 MB.
TIP: If you still encounter buffering or stuttering during video streaming, it may help to change the “Read Factor” value to “5x”.
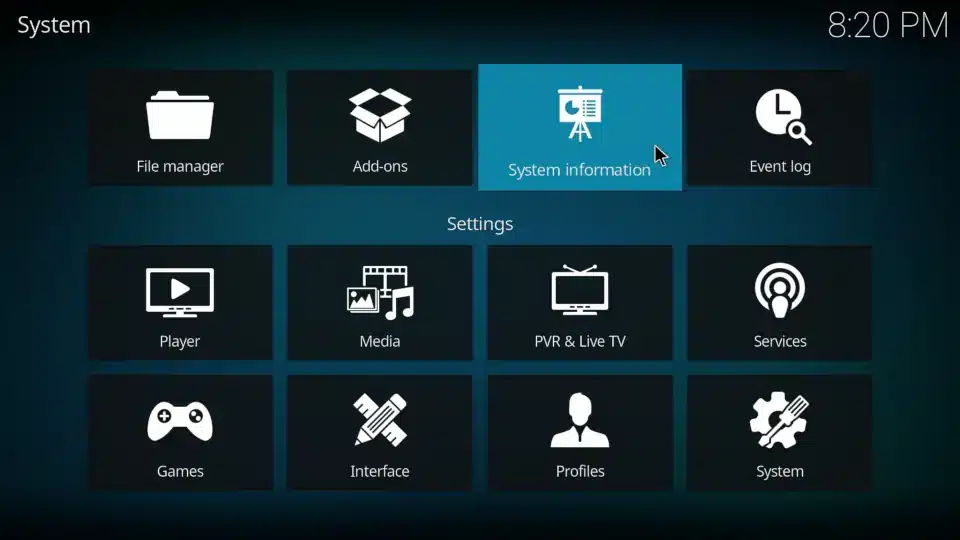
To easily find out how much memory your Kodi player has, go back to the settings screen and click on “System Information”.
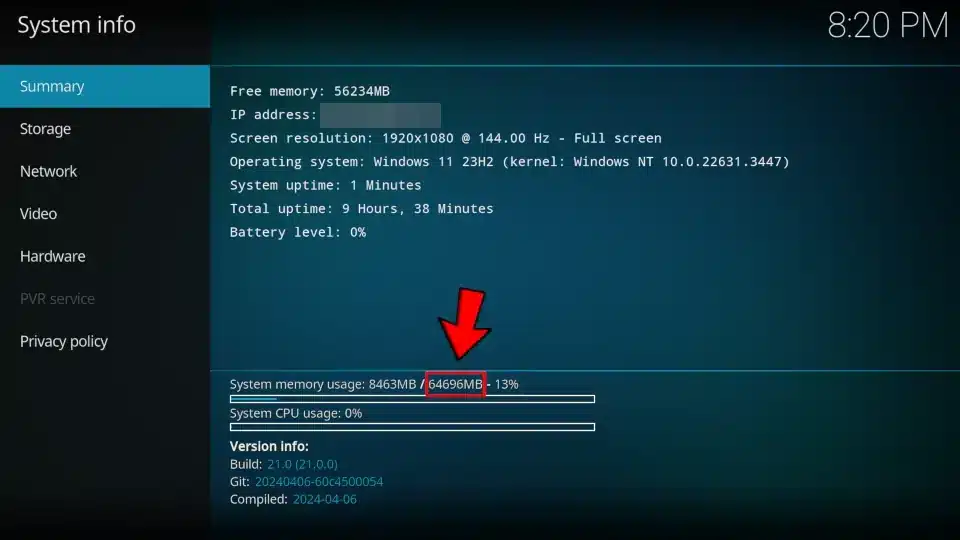
Under the “Summary” tab, the “System memory usage” is displayed at the bottom of the screen. The number after the slash is the maximum available memory.
In this example, it is 64696 MB, which corresponds to 64 GB. However, this is a very high value. In most cases, up to 8 GB of RAM or less is installed.
Method #1: Use Open Wizard Kodi Addon
The Open Wizard Kodi Addon is a maintenance utility to keep your Kodi system slim and fast. With this addon you can delete temporary files, thumbnails, packages, create backups but most importantly you can also edit your Kodi cache settings in order to fix Kodi buffering! The best thing about this: The Open Wizard can be installed just like any other addon.
Use our guide to install the Open Wizard Kodi Addon by clicking here.
Afterwards follow these steps to edit your Kodi cache settings:
01 – Before you start please check your amount of RAM since it’s important to know later. Start Kodi and click on the little gear icon at the top left. Then select “System information”.
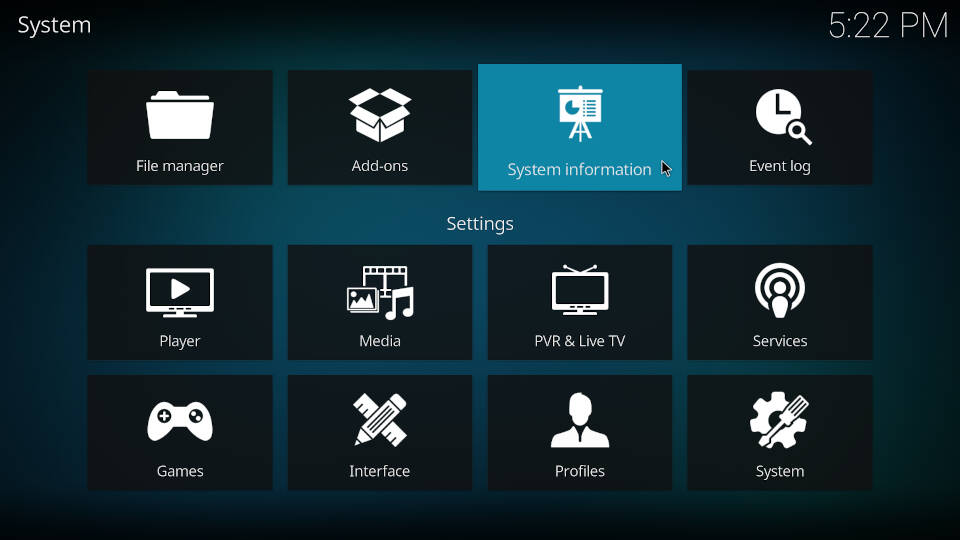
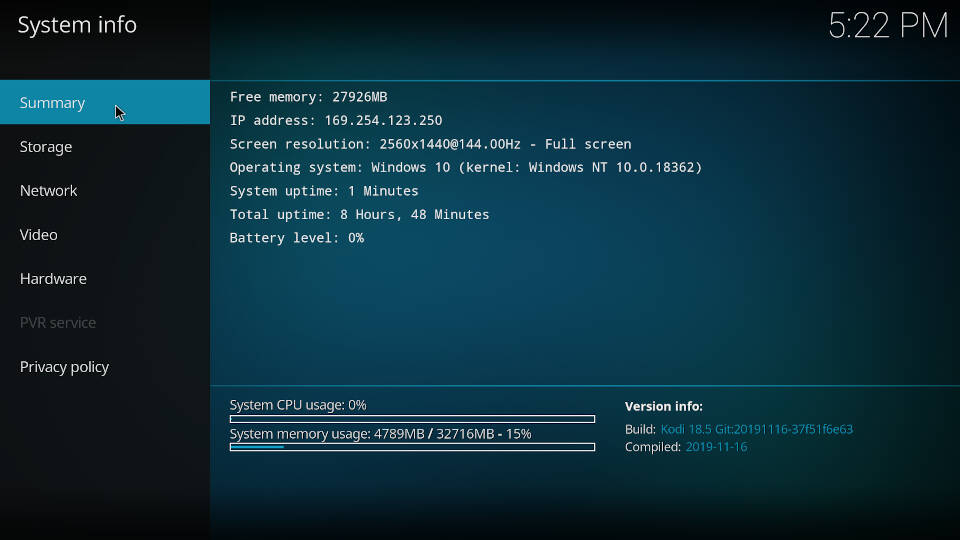
02 – Navigate to “Summary” on the left side and take a look at the bottom at “System memory usage”. Remember the value after the slash (in this example it’s 32716MB). In most cases you are using streaming devices like Amazon Fire TV, Nvidia Shield TV or Android TV boxes. Most likely your value is something between 1024 MB and 8192 MB.
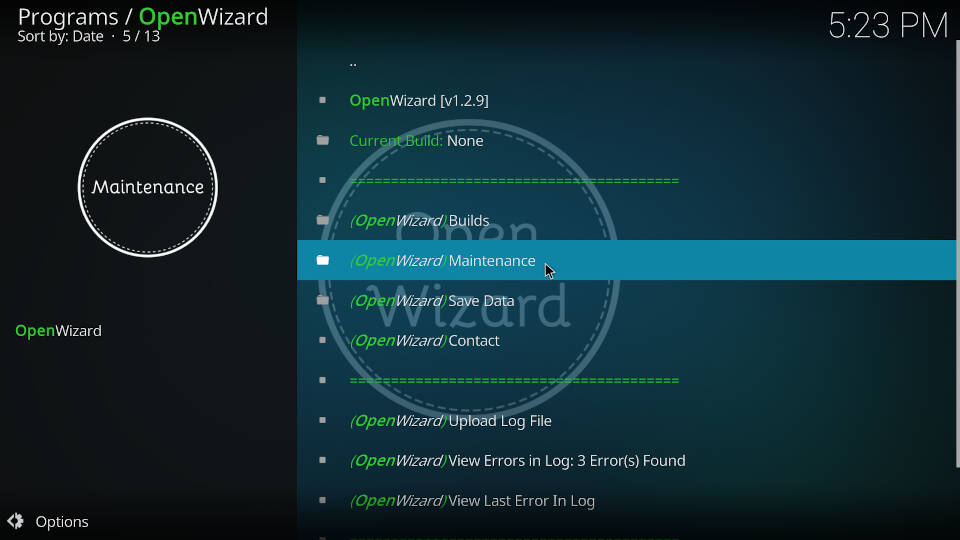
03 – Go back to the Kodi home screen and open the Open Wizard Kodi Addon. In the main menu select “Maintenance”.
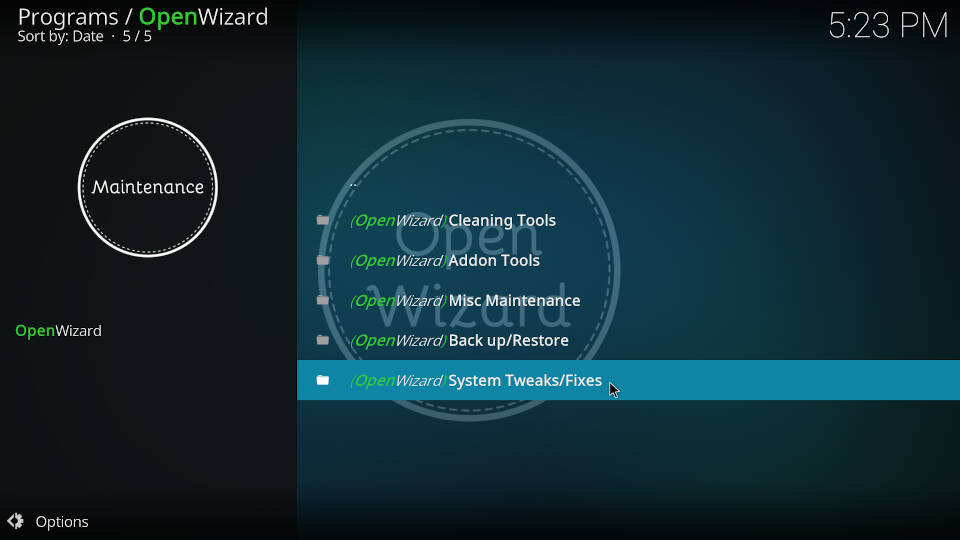
04 – Click on “System Tweaks / Fixes”.
05 – Now select “Advanced Settings”.
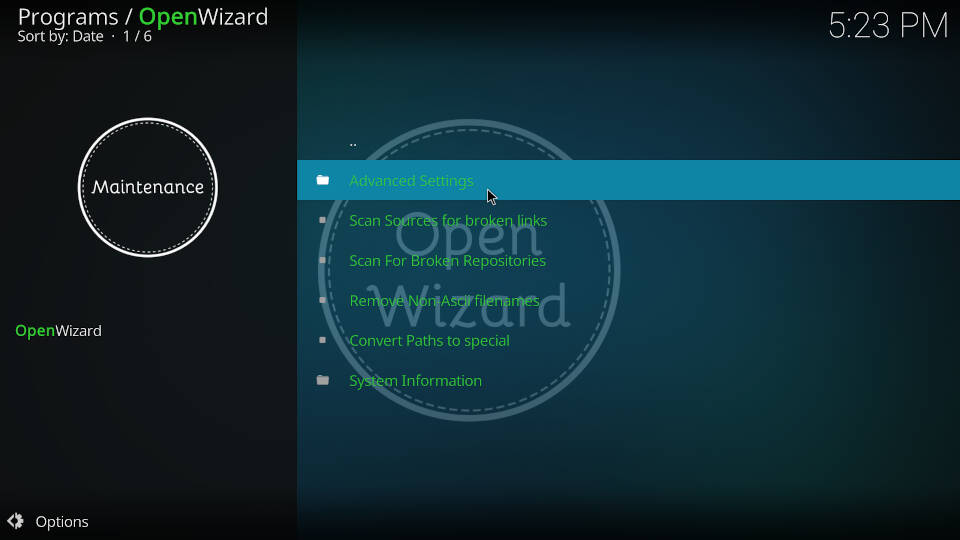
06 – Click on “Cache & Network Presets”.
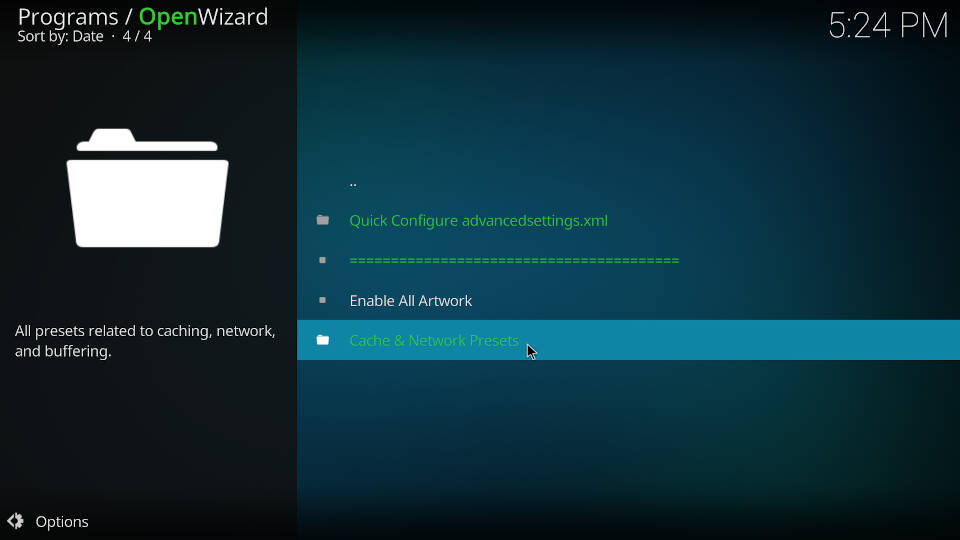
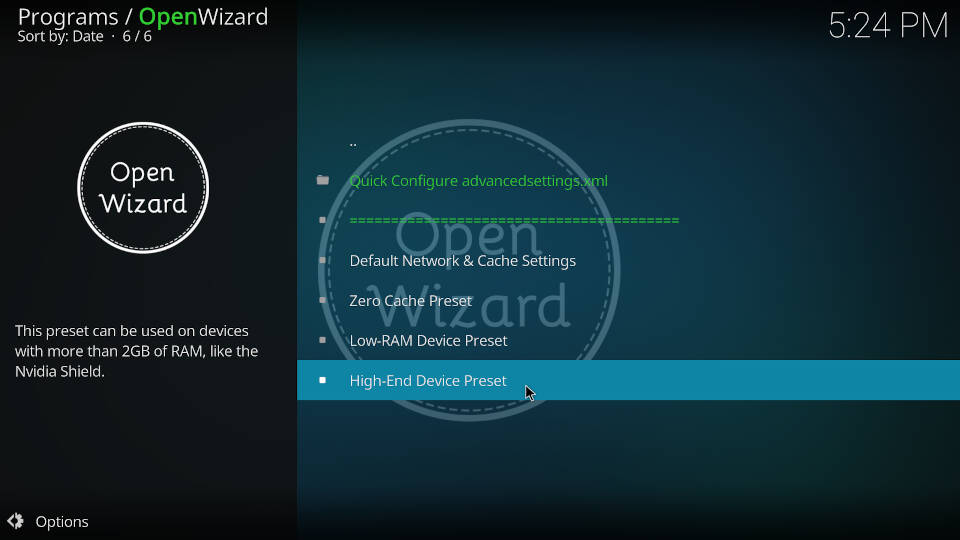
07 – In this screen you need to choose between “Low-RAM Device Preset” and “High-End Device Preset”.
If you are using a device with a system memory of 2048 MB or more, click on “High-End Device Preset”. Else select “Low-RAM Device Preset”.
Please make sure to NOT click on “Zero Cache Preset” since it will make your video streaming experience unstable and a lot worse.
08 – Now the Open Wizard Kodi Addon wants to download a specific configuration file for your Kodi cache settings. Click on “Install”.
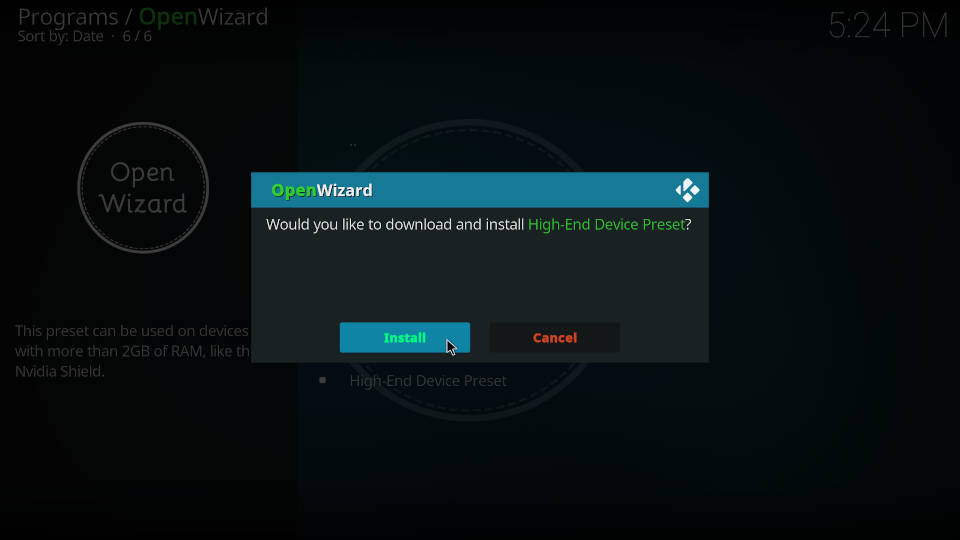
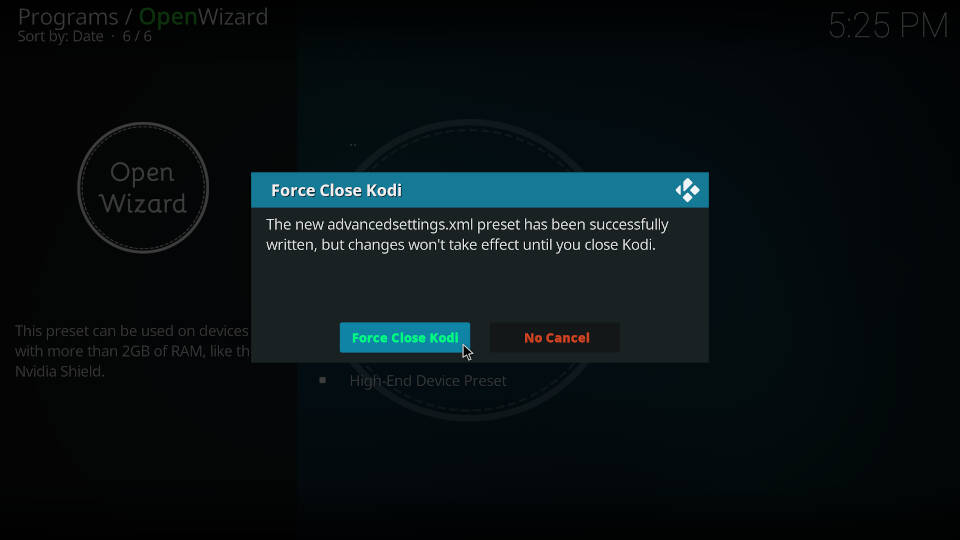
09 – Afterwards you need to restart Kodi so that the new cache settings will take effect.
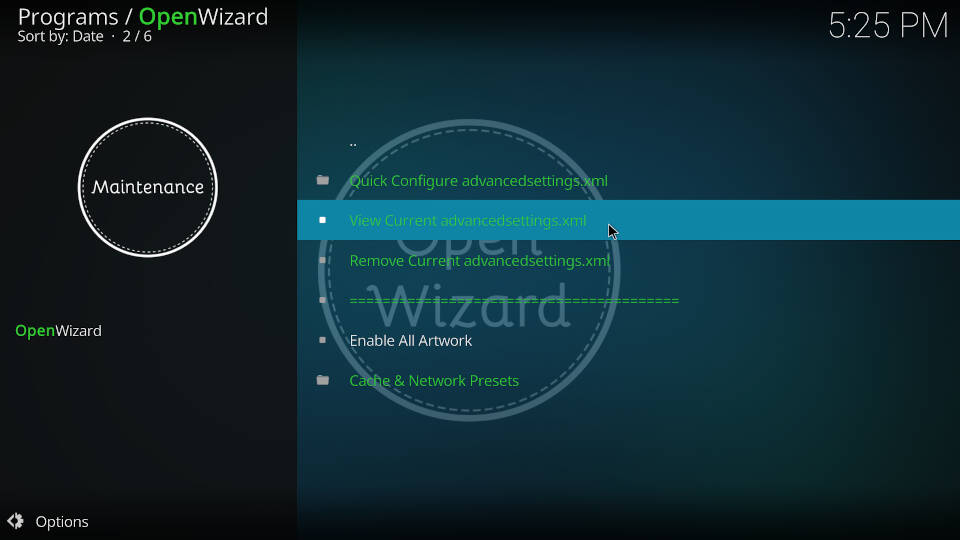
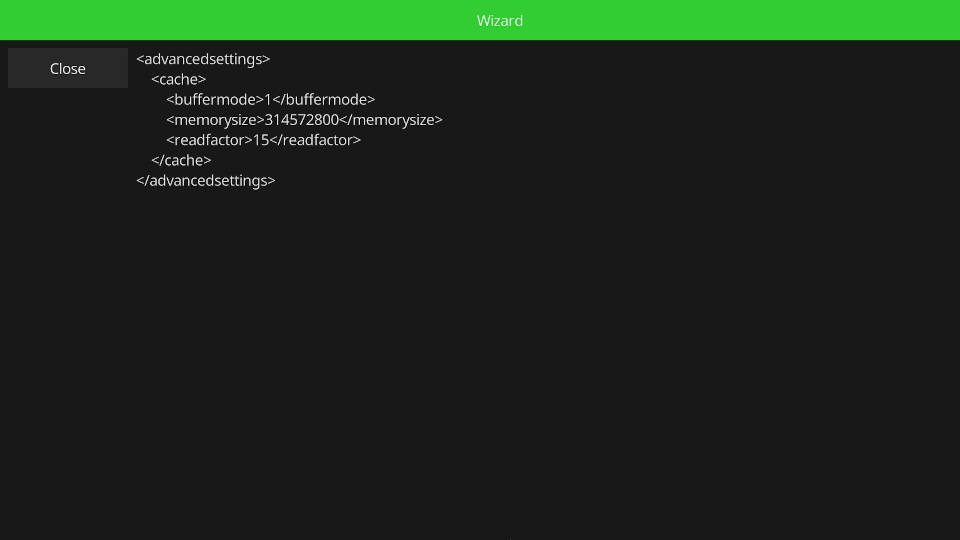
10 – After a restart you can open the Open Wizard Kodi Addon again and navigate to the same menu. You can see your modified Kodi Cache settings by clicking on “View Current AdvancedSettings.xml”.
11 – The “buffermode” tells Kodi how to handle video streaming in general. The “memorysize” is the actual size of your Kodi cache which is depending on your available system memory (however it is NOT a byte value by any means). The value for “readfactor” describes how Kodi actually reads and encodes the cache.
However you don’t really need to understand any of it since the Open Wizard has already done it for you.
Method #2: Create and edit AdvancedSettings.xml manually
The “AdvancedSettings.xml” file is hidden but quite powerful since you can edit a lot of Kodi settings in there. With the help of the AdvancedSettings file you can adjust your Kodi cache settings and potentially fix Kodi buffering issues.
The following steps should only be performed by advanced Kodi users! In most cases it is fine to use the Open Wizard Kodi Addon which does all the magic for you in just a couple of clicks. Just scroll up a little bit to find out how.
The AdvancedSettings.xml file is located in the userdata folder of your Kodi system. For example if you are using Android (Fire TV Stick, Nvidia Shield TV or Android TV boxes) the exact path is „Android/data/org.xbmc.kodi/files/.kodi/userdata/“.
The userdata folder paths on all operating systems and Kodi distributions:
- Android: android/data/org.xbmc.kodi/files/.kodi/userdata/
- iOS: /private/var/mobile/Library/Preferences/Kodi/userdata/
- LibreELEC: /storage/.kodi/userdata/
- Linux: ~/.kodi/userdata/
- OSMC: /home/osmc/.kodi/userdata/
- Mac: /Users/<username>/Library/Application Support/Kodi/userdata/
- tvOS: /private/var/mobile/Library/Preferences/Kodi/userdata/
- Windows: %APPDATA%\Kodi\userdata
- Windows Portable: <Install_location>\portable_data\userdata\
- Windows App: %LOCALAPPDATA%\Packages\XBMCFoundation.Kodi_4n2hpmxwrvr6p\LocalCache\Roaming\Kodi\
If you know of what folder we are talking about it’s most likely no problem for you to navigate to that path. Users of LibreELEC may use SMB, while Android users want to check out special file manager apps like “ES File Explorer” or “Root Browser Classic” to edit files and folders directly on your Android device.
Within the userdata folder create a file called “AdvancedSettings.xml” and edit it. If the file is already existing delete everything inside and start with a blank piece of virtual paper. You want to put in this code:
<advancedsettings>

<cache>

<buffermode>1</buffermode>

<memorysize>YOUR_VALUE</memorysize>

<readfactor>15</readfactor>

</cache>

</advancedsettings>
YOUR_VALUE is the value you get by multiplying 209715200 by the amount of your system memory in GB (for example 209715200 x 2 GB RAM). However we highly suggest you to not type in a value larger than “314572800”.
Save the file, restart your Kodi and the changes will take effect immediately.
gostei da atualização de buffer para o kodi 21
Definitely works with Kodi 20.3 running on a 4K Fire Stick.
yeah that multiplying the ram by that huge number but suggesting not to exceed a larger number than ? yeah hard to follow all of that so now I have to the AdvancedSettings.xml file in the folder with YOUR value or whatever no specific numbers or anything because yeah this wasn’t very specific. The open wizard addon is alright tho. I just haven’t applied the tweak or anything because what’s the sense when I cannot figure out the AdvancedSettings.xml I have read in some threads on redit that this does work when it comes to resolving buffering issues when it comes to watching IPTV.
Out of date.
OpenWizard doesn’t do anything on kodi 20
AdvancedSettings.xml not present
pessoal anotem o número da memoria livre do kodi se for até 2 gigas coloquem law se for mais de 2gigas coloque no hight, e pronto problema resolvido, observação, algumas tv box mentem o valor da memória livre
My Kodi (v19.5) shows 75% of memory used. I only have 5 Add-Ons. I tried your OW method about and it didn’t do anything for me.
This only started a few days ago. Usually things run pretty good.
Outside of Kodi my speed test is much faster than the OW test.
What else can I do to lower the memory usage? My first thought is to delete everything and reinstall.
Any suggestions?
PS – I’m using a 4k Firestick.
Maybe some other applications are using the memory, you should check that first before doing a reinstall.
A clean install will fix your memory /storage issues. Kodi platform grows with use just like Windows and other platforms. All updates, addons and patches are cumulative in terms of space.
o cache eu deixei padrao do ez maintenance,apenas coloquei read factor 4.
eu resolvi os problemas com ez maintenance, depois fui no arquivo advanced settings e coloquei read factor no 4, ficou assim buffer 2 read factor 4 e está ótimo, sim estou usando vpn também
fixed my tv app kodi 19 running smoooth.
With the same android box (4g ram), in kodi 17 i can set buffer size to 600000000 and it works, but in kodi 19 if i set buffer more than 350000000 i can’t wtach videos
Hi,
I followed your instructions withe Chef Wizard which seems to offer similar options. Having ascertained the RAM on my 4K Max Firestick I installed the Low-RAM Device Pre-set on to Kodi and then force closed. After doing this Kodi will not re-open. Any thoughts on why or possible solutions to Kodi not opening after this tweak?
Thanks
Worked for me! Might be a good shout to suggest what to do after you’ve done a to z like go start something you had an issue with before kinda thing bur clicked a link and no issue! Thanks 🔥
I use kodi on my laptop it seems if i use bluetooth head set it starts to skip i made it wired it stopped skipping
Didn’t help me. Followed it from A to Z but no change in stuttering, even on locally stored video that played nicely in Leia. Also tried preventing hardware acceleration but no difference.
Any other ideas besides downgrading?
When locally stored videos are stuttering you may have to change the deinterlace method in your video settings during playback.
I helped video by changing my router’s MTU setting slightly lower than all the recommended procedures. My suspicion is that data was getting out of order, and the reassembly hindered playback by causing a chain reaction. All I know is that streaming has been consistently better since.
After updating to 19 it locks buffering in videos on demand is loading 100 and locked even with these tips, I use windows 10 so far I have not found a solution beyond the downgrade, it is as if it reached a certain part of the buffer and then stopped to load
I have upgraded to Kod1 19 and initially all worked fine. The I started having buffering issues whilst watching Films and TV programs. Installed Open Wizzard and selected Low-RAM Device Preset as I have KODI installed on an Amazon Fire Stick. However I am still encountering buffering. I am watching Films and TV programs using …
Nice. But TT Bufferfix doesn’t work on 18.9. Do you know why? Also,most advancesettings adjustments have readfactor 4.
Re- supermon – Thanks but how do I do Buffer 4 ?
Edit advancedsettings.xml like this:
4
YOUR_VALUE
15
This made no difference running a 4K capable screen, AMD-A12 CPU, 16G RAM, with the video file stored on a local HDD.
Stutters and carries on like a drunken sailor as it did before I implemented the above.
Looks like 1080p remains the best for now.
buffermode 1 only helps with internet sources. try 4
Huh? Why would one have buffering or performance issues when media is stored on your drive? Kodi is largely “internet based” so obviously buffermode would be set to 1
buffermode 1 is for all filesystems.
This setting will force Kodi to use a cache for all video files, including local network, internet, and even the local hard drive. Default value is 0 and will only cache videos that use internet file paths/sources.
0 Buffer all internet filesystems (like “2” but additionally also ftp, webdav, etc.) (default)
1 Buffer all filesystems, both internet and local
2 Only buffer true internet filesystems (streams) (http, etc.)
3 No buffer
4 All network filesystems (incl. smb, nfs, etc.)
Great looking web site. Presume you did a great deal of your own coding.
I have had this ever since installing Kodi 19.3 windows version 10, at first I thought it was a dodgy installation or my internet connection..was happening all the time.
Reinstalled Kodi from scratch ..same issue
I have a Lenovo I5 Intel with ssd pc .. using 5Metre HDMI cable to 4k TV I was about to give up because nearly everything was coming up saying sources too low .. caching all the time jittering etc
However, after placing the HDMI cable on the actual PCs motherboard HDMI output and not the 3rd party one placed in the AGP slot this fixed it for me .. the CPU doesnt spike at all anymore .. im not syaing this could fix yours if you have this ssue ..but its what worked for us .. loving Kodi again now